Control Panel
Getting There
You can get to CE Cache in the ExpressionEngine® Control Panel by clicking on Developer -> Add-On Manager -> CE Cache.
The CE Cache CP Home Page
When you arrive at the CE Cache Module Page, you should see something like the following:
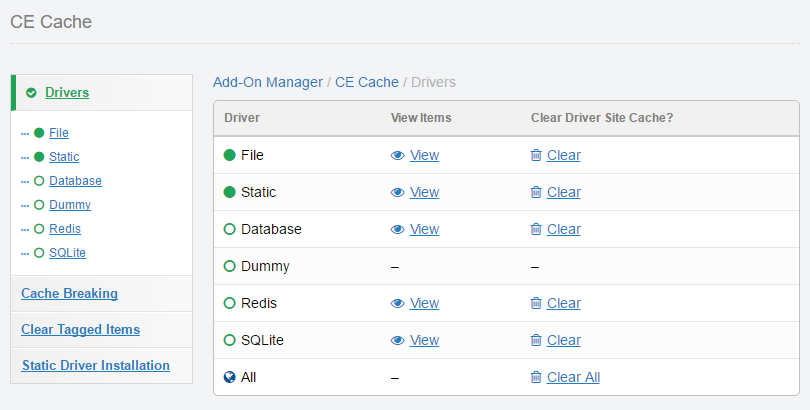
This page simply lists out the drivers that are currently supported on your server. If you have Memcache, Memcached, APC/APCu, SQLite, and/or Redis installed, they will show up in the list. The Dummy, Database, and File drivers will always be enabled.
From this list, you can choose to view the cached items, clear the site cache (the driver’s cache for the current site), or clear the entire cache (the entire cache for the chosen driver).
Note: Some drivers may not have all options. The Memcache and Memcached drivers do not have the ability to view items, or clear the driver site cache for a specific site, due to their inherit design. The Dummy driver intentionally has no functionality.
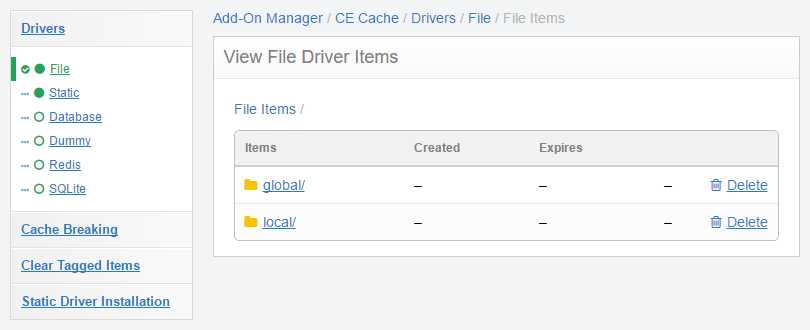
View Driver Cached Items
You can view the cached items for each driver. This page gives detailed information on when the items were created and when they will expire. You can click on the folder icons and breadcrumbs to easily navigate through the hierarchy of items. You can also delete an item, or even delete all of the child items of a path segment (folder).
View Cached Item
In addition to the options above, you can also view the data for a particular cached item by clicking on its “View” link. The View Item page gives you detailed information about the item. You can even see the cached item’s content.
This page can be really useful for debugging purposes, as you can make sure that your escaped content is being cached as you intended it to, and you can update your code accordingly.
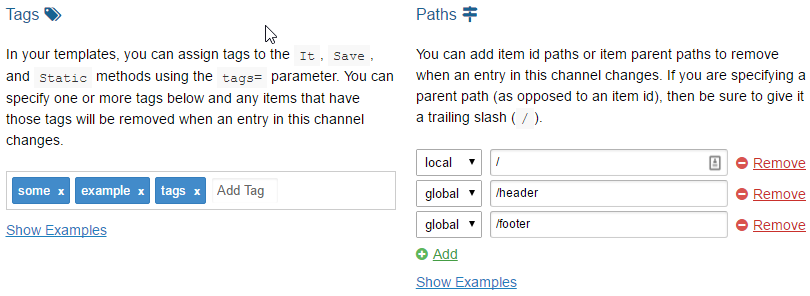
Cache Breaking
The Cache Breaking section allows you to specify which caches you would like to break whenever one or more entries from a channel are added, updated, or deleted for the current site. You can choose which caches you would like to break by their saved id or path, or even elect to only break entries that were tagged with a certain name. This page has instructions and examples of how to set up cache breaking.
Another cool thing about breaking the item caches using these settings is that you can use several variables to easily specify which caches to break. For example, to clear all local caches where {segment_1} matched the current {channel_name} and {segment_2} matched the {url_title}, you could simply add a cache breaking rule of local/{channel_name}/{url_title}/.
Asynchronous Cache Breaking
By default, CE Cache attempts to break the cache asynchronously. This allows tasks that can take a while–such as clearing and refreshing multiple cache items–to work in the background. However, the asynchronous requests need to be able to reach the CE Cache module.
Note: There are several things that will prevent asynchronous cache breaking from working. For example, if the site is protected with http authentication via .htaccess and requires a password to access (view the workaround below), or if the ExpressionEngine® system is put into 'Offline' mode. Basically, if PHP cannot reach the site for any reason, the asynchronous cache breaking will not work.
To get HTTP Authentication to work with asynchronous requests, you need to whitelist the server’s IP address in your .htaccess so that the requests from the server can get through. In the following .htaccess authentication example, the two lines starting with "Allow from" permit requests that are coming from the local server to be received without the .htaccess authentication (be sure to change the paths and the your.server.ip.here text to your server's IP):
AuthName "protected area"
AuthUserFile /path/goes/here/to/.htpasswd
AuthGroupFile /path/goes/here/to/.htgroup
Require valid-user
Order Deny,Allow
Deny from all
Allow from your.server.ip.here #server IP
Allow from 127.0.0.1 #localhost
Satisfy Any
If it is not possible to use asynchronous requests for some reason, you can switch to synchronous requests via the $config['ce_cache_async'] = 'no'; config setting.
Note: Cache refreshing will not work if the 'ce_cache_async' setting is set to 'no' (see the Configuration page for more details).