Advanced
Remote Image Manipulation
How To Use A Remote Image
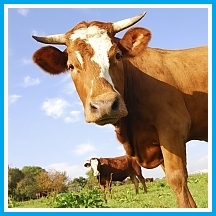
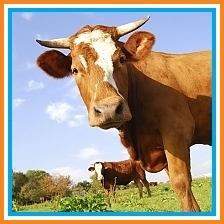
This plugin makes working with remote images very easy. Simply pass in a full URL as the source parameter (for example: src="http://www.example.com/some_image.png").
How Is This Possible?
PHP can only manipulate images that are on the local server. So if an image is located on another server, it must first be downloaded to your server before it is manipulated. The caveat here is that if the images are too large (depending on your configuration and hardware), PHP may have difficulties copying the image over. If the image is 1000px by 1000px or less, your configuration should be able to grab and cache the remote image gracefully.
In order to determine if an image is remote or not, it must be compared to the current domain. In general, this should happen automatically, but if you have any troubles, you can specify the current domain, by assigning a value to the $current_domain variable in pi.ce_img.php file (initially set to "").
What If The Remote Image Changes?
One of the great things about this plugin, is that it strives to keep your manipulated images up-to-date. Please take a look at the remote_cache_time= parameter to see how you can control how CE Image checks for updates (or not) for your remote images. The remote_cache_time can be set by changing the $remote_cache_time variable pi.ce_img.php (lowest priority), overriding it in config.php (medium priority), and anytime via the remote_cache_time= parameter (highest priority).
Multiple Processing
At times, you may find that you want to process an image multiple times. This is possible in various ways with CE Image.
Pair-Single Syntax Combo
One simple way to go about processing an image more than once is to mix the “single” and “pair” syntax. This will allow you to call a single tag plugin from within a tag pair plugin, as shown below:
{exp:ce_img:single src="{made}" border="4|00a6e7"}
{/exp:ce_img:pair}
The above code first processes the outer pair tag (notice the parse="inward"), and then passes the source to the single tag plugin. Since both apply a border, you get an image with two borders:
Variable Prefixing
The above solution will only allow you to nest one level deep. By employing variable prefixing, you can theoretically nest images as many times as you would like (it would probably not be quick and at some point you would run out of memory). Here’s an example of an image that is processed 3 times to add 3 borders.
{exp:ce_img:pair:mid src="{outer:made}" border="4|fff" parse="inward"}
{exp:ce_img:pair:inner src="{mid:made}" border="4|#f6861f"}
<img src="{inner:made}" width="{inner:width}" height="{inner:height}" />
{/exp:ce_img:pair:inner}
{/exp:ce_img:pair:mid}
{/exp:ce_img:pair:outer}
Note: Keep in mind that an image is being created and cached for each depth of the process. For this reason, it is best to avoid multiple processing. If you must do it, it is probably a good idea to cache the outer tag using ExpressionEngine®’s native tag caching. You may also want to check out the performance page.
Order Of Operations
This plugin gives you a tremendous amount of flexibility in how you manipulate images, but it does have to decide which parameters to process first. Understanding this order can be useful when figuring out how to achieve your desired outcome. The following is the order of operations for the plugin:
- background color
- size, crop, and flip
- filters (processed in the order they were passed in)
- watermark
- borders & rounded corners
- reflection
- rotation
- ASCII Art
- average color
- top colors
Please note that if one or more of the above operations is not requested in the plugin parameters, it is effectively skipped.
PHP Usage (In Add-ons or Templates)
The plugin harnesses the CE Image class for all of its heavy lifting. You can also use this class in your add-ons and and your PHP enabled templates! Here’s an example:
if ( ! class_exists( 'CE_image' ) )
{
require PATH_THIRD . 'ce_img/libraries/Ce_image.php';
}
//initialize CE Image
$ce_image = new Ce_image();
//create the image
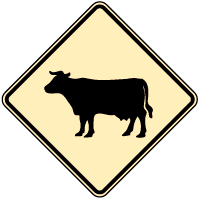
$ce_image->make( '/images/example/cow-sign.png',
array(
'filters' => 'sepia'
)
);
//create the tag
echo $ce_image->create_tag();
//close the image
$ce_image->close();
Extension Hooks
CE Image’s hooks allow you to extend CE Image’s functionality in various ways.
ce_img_start
Called the first time CE Image starts. It passes no parameters, and expects no return data.
Here’s the extension call code from the add-on:
{
$this->EE->extensions->call('ce_img_start');
}
This hook can be useful when extending CE Image, as it allows you to prepare your settings, and update the Ce_img::valid_params array so CE Image knows which tag parameters to be excluded as tag attributes.
ce_img_pre_parse
This hook allows you to manipulate the CE Image output before it is returned to the template. The hook passes the following variables:
- $tagdata: The un-parsed tagdata.
- $variables: The array of all of the variables that CE Image parses.
- $var_prefix: The variable prefix. Be sure to always include the variable prefix when parsing your own variables.
Here’s the relevant code for the extension call:
if ($this->EE->extensions->active_hook('ce_img_pre_parse'))
{
$tagdata = $this->EE->extensions->call('ce_img_pre_parse', $tagdata, $variables, $var_prefix );
}
//parse
$parsed = $this->EE->TMPL->parse_variables_row( $tagdata, $variables );
Note: Please notice that the tagdata is parsed after the extension hook is run. Please do not parse the entire variable array yourself. Rather, only parse the variables or manipulations that are relevant to your add-on, and leave the other parts of the tagdata un-parsed. This allows the most flexibility as it ensures other add-ons will get the chance to make changes too.
Note: You must always return the tagdata in your method, even if you don’t make any changes to it!
One useful variable that is passed into the $varialbes array is 'final_action'. The value of the variable will be 'saved', 'cached', or 'none' depending on what was done with the image. You can get the action in your add-on like this:
ce_img_saved
Called whenever an image is saved. The hook passes the following variables:
- $this->path_final: The sever path to the saved image.
- $type: The image type, which will be one of the following: 'png', 'gif', 'jpg'.
The hook call:
{
$this->EE->extensions->call('ce_img_saved', $this->path_final, $type );
}
As you can see, no return data is expected.